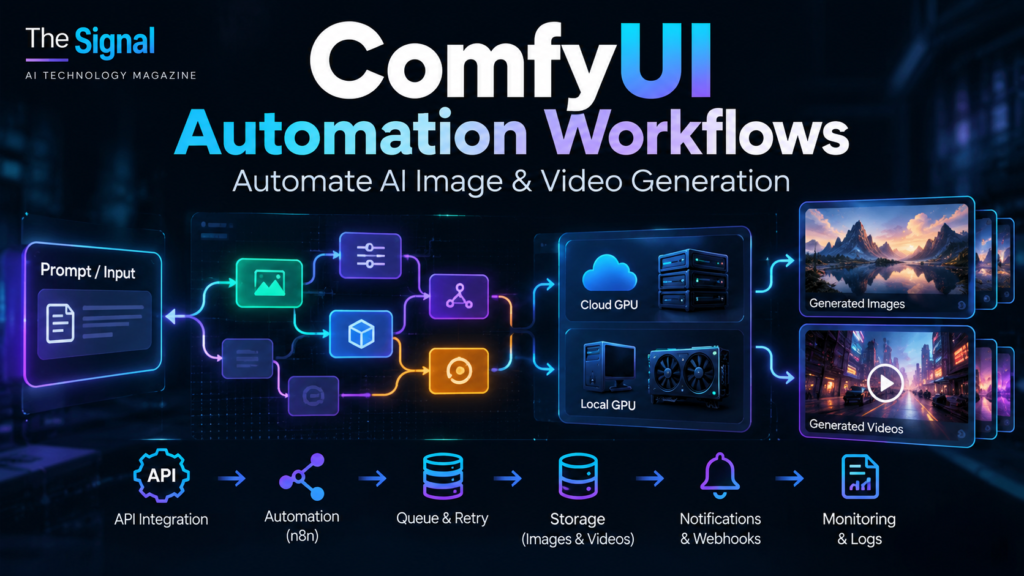
TL;DR: ComfyUI can be used as the generation engine inside a larger automation system. A typical pipeline receives a trigger, changes selected inputs in a workflow JSON, submits the graph to ComfyUI, tracks the job, retrieves the generated image or video, then sends the result to storage, a CMS, a messaging app or another business workflow.
This is useful when you want to move beyond manually opening ComfyUI and clicking Run for every asset. The same node graph can become a reusable generation service for product creatives, social media assets, video jobs, batch processing and AI-agent workflows.
What does ComfyUI automation mean?
ComfyUI is a node-based interface and inference engine for generative AI. Automation keeps that graph as the generation layer while another system controls when it runs and what inputs it receives. The orchestrator can be your own application, a script, an AI agent or a workflow platform such as n8n.
The important separation is simple: ComfyUI executes the generative graph; the automation layer handles triggers, business logic, storage, notifications and downstream actions.
The basic automation architecture
A practical automated pipeline usually looks like this:
- Trigger: a webhook, form submission, database row, order, schedule or agent request starts the job.
- Validate inputs: check the prompt, media files and parameters before spending GPU time.
- Prepare the workflow: load a known ComfyUI workflow and replace only the parameters that should be dynamic.
- Submit: send the workflow to the ComfyUI execution service.
- Track: keep the returned job or prompt identifier and monitor completion or errors.
- Retrieve outputs: collect the generated image, video or other media.
- Deliver: store it, send it for human approval, publish it or pass it to the next automation step.
Workflow JSON is the automation contract
A ComfyUI workflow is a graph of nodes, inputs and connections. For automation, treat a tested workflow as a versioned template rather than rebuilding the graph for every request. Your application changes a small set of controlled values—such as prompt text, seed, input image or generation settings—while the rest of the graph stays stable.
This is safer than allowing arbitrary workflow JSON from an external user. It also makes failures easier to reproduce because each job can record which workflow version and parameters were used.
Automating ComfyUI with n8n
n8n fits naturally around ComfyUI because it can receive webhooks, transform JSON, call HTTP endpoints, wait or loop while a generation runs, store metadata and then send the output to another service.
A simple pattern is:
Webhook → Validate/Set parameters → Submit ComfyUI workflow → Save prompt ID → Wait/check status → Retrieve output → Cloud storage/CMS/notification.
You do not need a community node to understand or implement this architecture. n8n’s HTTP Request nodes can talk to a reachable ComfyUI service directly. Community integrations can make media upload, progress monitoring and output retrieval more convenient, but they add another dependency that should be version-pinned and tested before production use.
Local ComfyUI + n8n: the networking trap
If n8n runs in Docker and ComfyUI runs on the host machine or in another container, localhost may point to the n8n container itself rather than your ComfyUI server. Use an explicit Docker network, a host bridge appropriate to your operating system, or another securely reachable address.
Do not expose an unauthenticated ComfyUI instance directly to the public internet just to make automation easier. Put authentication and network controls in front of externally reachable generation infrastructure.
Image automation example
Imagine an e-commerce creative pipeline. A new product enters a database with a product name, benefit, image and target format. n8n validates the record, generates or receives the creative prompt, injects the prompt and product image into a tested ComfyUI workflow, submits the graph, waits for completion and stores the generated creative. A human approval step can then decide whether the asset is delivered or regenerated.
The same architecture works for batch thumbnails, ad variations, blog images and catalog creatives.
Video automation example
Video workflows use the same orchestration pattern but need stricter controls because they are slower, heavier and more expensive. Validate duration, resolution and input media before queueing the job. Store state outside the workflow runner so a timeout or worker restart does not lose the business job.
If you are still designing the generation graph itself, start with our ComfyUI video workflow guide before adding automation around it.
Queues, retries and idempotency
A demo can submit one request and wait for a result. Production automation needs more. Give every business job its own ID, save the ComfyUI prompt/job ID, and distinguish queued, running, completed and failed states.
Retries should not blindly create duplicate assets. Before resubmitting a failed or timed-out request, check whether the original generation actually completed. This is especially important when the next step publishes content, sends a client asset or consumes paid compute.
Human approval before publishing
For commercial creative pipelines, generation and publication should usually be separate states. ComfyUI can create the asset automatically, but a reviewer can approve, reject or request another version before the workflow posts it to a store, ad library, social account or client folder.
This makes automation faster without turning every model output into an automatically published asset.
Comfy Cloud vs local automation
Local ComfyUI gives you maximum environment control and can be economical if you already own the hardware. Cloud execution removes much of the GPU infrastructure work and is useful when the automation needs more VRAM or should not depend on a workstation being online.
For the infrastructure trade-offs, see Comfy Cloud vs Local GPU. If you have no suitable GPU, our ComfyUI Cloud guide explains the hosted option.
ComfyUI automation with AI agents and MCP
Automation does not have to start from a fixed webhook. Comfy’s agent tooling can let compatible AI agents interact with ComfyUI workflows. That opens a different pattern: an agent can decide which creative task is needed, while ComfyUI remains the specialized execution layer.
For production systems, keep the same controls even when an agent is involved: validate inputs, restrict allowed workflows and parameters, track every job, limit credentials and require approval for consequential downstream actions.
A production-ready checklist
- Keep tested workflow templates under version control.
- Validate prompts, files and generation parameters before execution.
- Do not expose raw generation infrastructure without authentication.
- Persist job IDs and execution state outside the GPU worker.
- Set timeouts appropriate to image versus video generation.
- Use retries that do not duplicate completed jobs.
- Store final media in durable storage rather than relying only on temporary worker output.
- Add human approval before automatic publication when quality or brand risk matters.
- Monitor failures, queue depth and generation latency.
- Regression-test important workflows after ComfyUI or custom-node updates.
Where to start
Start with one workflow that already runs reliably by hand. Make only one or two inputs dynamic, trigger it from a simple webhook, store the returned job identifier and retrieve the output. Once that path is reliable, add storage, retries, approval and downstream integrations one layer at a time.
If ComfyUI itself is not installed yet, begin with our ComfyUI installation guide. For the broader node-based workflow concepts, read the ComfyUI guide.
Sources
Primary technical reference: ComfyUI official documentation, including the ComfyUI server communication documentation and agent tooling. Implementation details can change as ComfyUI evolves, so verify endpoint behavior against the version you deploy.